Automotive Refinishing Explained: How a Professional Car and Two-Wheeler Paint System Really Works
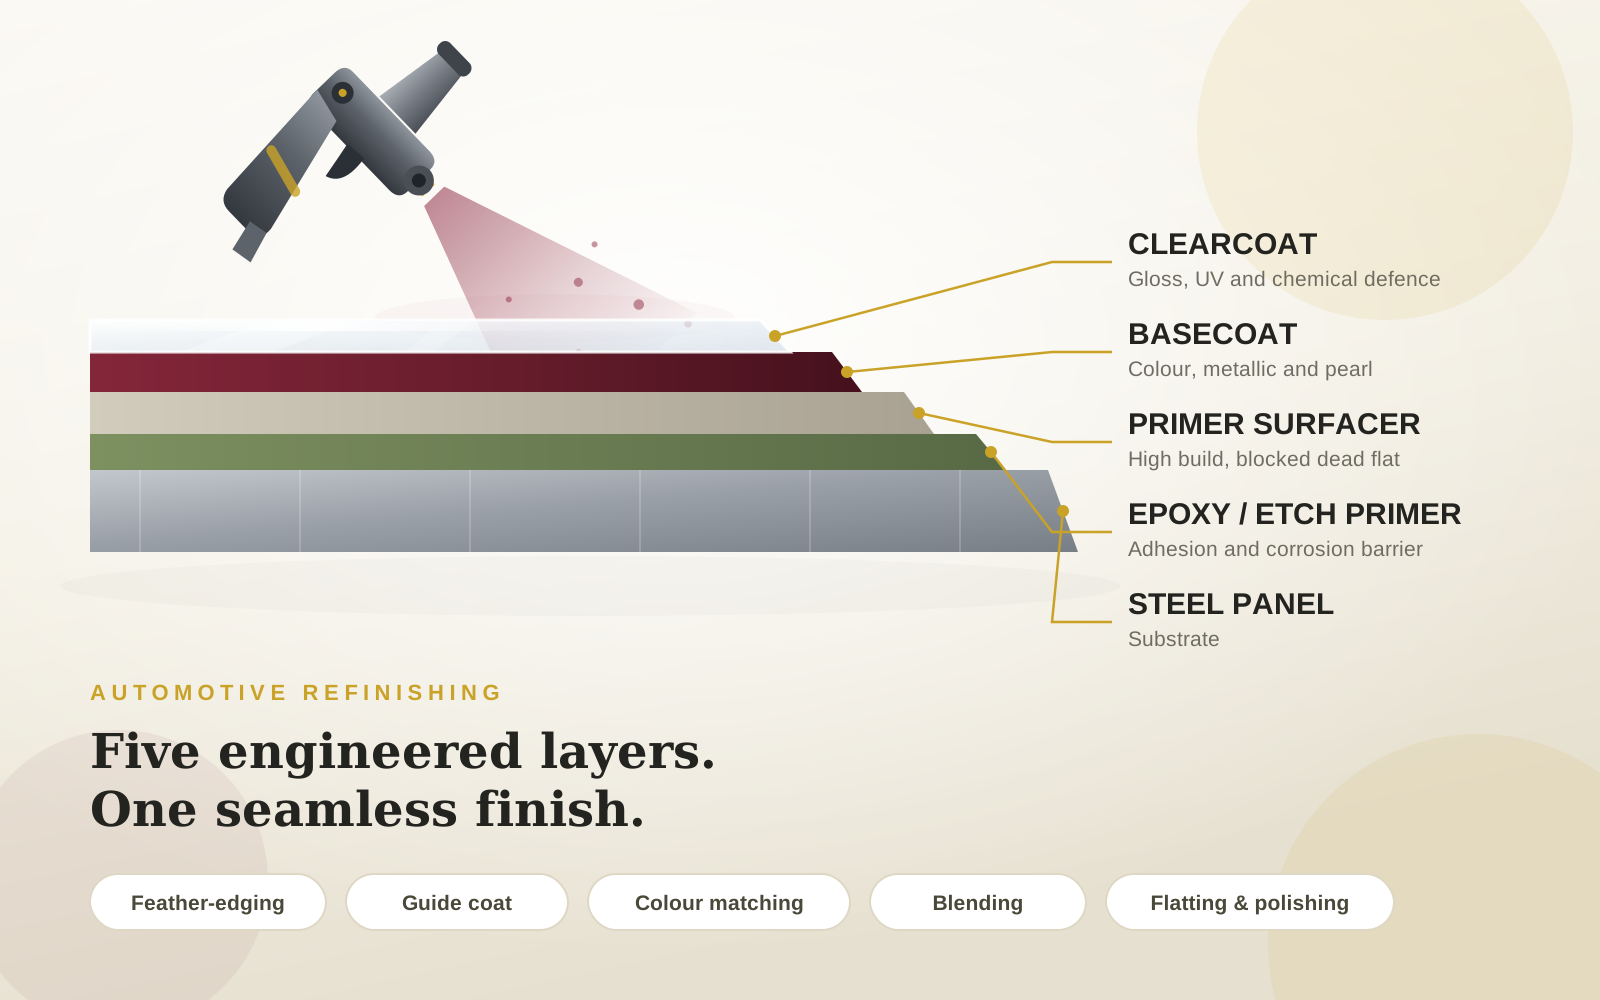
Walk past a well-finished car in daylight and your eye reads one thing: a single, seamless skin of colour. That impression is an illusion. What you are actually looking at is a carefully engineered stack of coatings, each layer only a fraction of the thickness of a human hair, and each one built to do a job the layers above and below it cannot do. Strip a bonnet back to bare steel and you will pass through corrosion protection, filling, colour, and a transparent armour layer before you reach metal.
This is why automotive work sits in a category of its own. A wall forgives. A vehicle panel does not. It is curved, it reflects light like a mirror, it flexes and vibrates, it is washed with detergents, blasted by grit at highway speed, parked under relentless sun, and expected to look showroom-fresh for years. A defect that would vanish on a plastered wall — a speck of dust, a slight difference in shade, a faint orange-peel texture — is glaringly obvious on a bonnet.
Whether you run a workshop, fabricate metal components, restore two-wheelers, or simply want to understand what you are paying for when a panel is repainted, this guide walks through how a professional refinishing system is built and where the results are actually won or lost.
The Anatomy of a Vehicle Paint System
Every serious automotive finish is a layered system. Understanding the layers explains almost everything about how repairs succeed or fail.
The substrate. Usually steel, but increasingly aluminium, galvanised sheet, or moulded plastic on bumpers, mudguards, and trim. Each of these behaves differently. Plastic flexes and needs an adhesion promoter and a flexible system; galvanised surfaces resist ordinary primers; aluminium oxidises instantly once abraded. Treating every panel as if it were mild steel is the first mistake many refinishers make.
The corrosion-protection layer. At the factory this is an electro-deposited coating that reaches into seams and cavities. In a workshop it is replaced by an etch or epoxy primer that bonds to bare metal and stops oxidation from creeping under the repair. This layer is invisible in the finished job and absolutely decisive in how long it lasts.
The primer surfacer. A high-build, sandable layer whose purpose is geometry, not protection. It fills the fine scratches left by sanding, levels the transition between filler and original paint, and creates the perfectly flat, uniform base that colour needs. Skimp here and every ripple underneath is amplified by the gloss above.
The basecoat. This is the colour itself — and only the colour. Modern basecoats carry pigment, metallic flake, or pearl particles, but they have almost no gloss and very little durability on their own. Left unprotected, a basecoat would fade and chalk within months.
The clearcoat. The transparent topcoat does the heavy lifting: gloss, depth, ultraviolet screening, chemical resistance against bird lime and industrial fallout, and resistance to the fine scratching that washing inflicts. When people say a car has “lost its shine”, the clearcoat has usually failed — the colour beneath is often intact.
Some solid, non-metallic colours are still applied as a single-stage system where pigment and gloss live in the same coat. That approach is simpler, easier to polish, and well suited to commercial vehicles, chassis work, and fabricated metal. Metallic and pearl finishes, however, essentially demand basecoat-plus-clearcoat, because flake orientation cannot be controlled in a glossy pigmented film.
Why Refinishing Is Harder Than Original Painting
A factory paints a bare shell in a sealed, climate-controlled line, at temperatures no assembled vehicle could survive. A refinisher works on a vehicle that already has paint, glass, rubber, plastic, wiring, and fuel in it, in a workshop where dust is a permanent adversary. More importantly, the factory has no neighbour to match. A refinisher does — the panel next to the repair, which has been weathering in the sun for years.
That single constraint shapes the whole discipline. The goal of refinishing is not to produce beautiful paint; it is to produce paint that is indistinguishable from what surrounds it.
Step One: Assess the Damage Honestly
Before anything is sanded, the panel has to be read. Is the metal merely scratched, or is it deformed? Has corrosion started from the back of the panel, where you cannot see it? Is the existing paint sound elsewhere, or is it lifting at the edges? Does the damage cross a body line or a panel edge, which changes how the repair must be blended?
Rust deserves special suspicion. Surface rust on an otherwise sound panel can be removed and treated. Rust that has perforated the metal, or that is spreading from an unsealed seam behind the panel, cannot be solved by coating — it must be cut out and repaired mechanically, or it will reappear through a perfect paint job within a season.
Step Two: Stripping, Sanding, and Feather-Edging
The damaged area is taken back to a stable foundation — often to bare metal at the centre of the repair — and the surrounding paint layers are sanded into a long, gradual taper. This feather-edge is what allows the repair to disappear. A sharp step between old and new paint will telegraph through every subsequent coat and show as a visible ring under gloss, no matter how much material is applied over it.
Grit progression matters here. Coarse abrasives cut fast but leave deep scratches that later layers must fill; finishing too coarse leaves sanding marks that show through the colour, while finishing too fine gives the primer nothing to grip. Professionals work through a deliberate sequence rather than reaching for whichever disc is on the bench.
Step Three: Restoring the Shape
Body filler restores contour, not strength. It should be applied thinly over properly prepared, clean metal and shaped with long boards rather than short blocks, because the human eye detects a subtle dip in a reflection far more easily than it detects a scratch. Filler must never be applied over paint at the edges of a repair where moisture can wick in behind it, and it must be fully cured before it is sealed — trapped solvent under primer causes shrinkage that appears weeks later as a sunken outline.
Step Four: Primer Surfacer and the Guide Coat
Once the repair is sealed and built up with primer surfacer, the professional trick is the guide coat: a fine mist of contrasting colour dusted over the primer before block sanding. As the block cuts the high spots, the guide coat is removed from them and remains sitting in every low spot and pinhole. What was invisible to the eye becomes obvious. Sanding continues until the guide coat has vanished completely — at which point the surface is genuinely flat rather than approximately flat.
Step Five: Colour Matching, the Real Skill
This is where refinishing separates the competent from the exceptional. The colour code on the vehicle is a starting point, not an answer. Two vehicles built with the same code can differ because of production batch variation, and every vehicle drifts from its original shade after years of ultraviolet exposure. A perfectly mixed factory-code colour sprayed next to a decade-old panel will often look obviously wrong.
Metallics complicate this further, because their appearance depends on how the aluminium flakes lie in the film. Spray the same paint wetter, or from further away, or at a different air pressure, and the flake orientation changes — producing a panel that matches perfectly when viewed straight on and shifts noticeably when viewed at an angle. This is why a spray-out card, sprayed with the same gun and technique that will be used on the vehicle and then checked against the panel in daylight, is not an optional formality. It is the only reliable test.
When a perfect match is not achievable, the answer is blending: the new colour is faded out into the adjacent panel so the eye never encounters a hard boundary, and the clearcoat is then carried across the whole panel to a natural break line. A blended repair with a slight colour difference is invisible. An unblended repair with a slight colour difference is a permanent advertisement.
Step Six: Application and Curing
Automotive coatings are unforgiving about how they are applied. Film thickness must fall inside a window — too thin and coverage, gloss, and protection suffer; too thick and the coating runs, traps solvent, and cures soft. Flash-off time between coats allows solvent to leave the film; rushing it seals solvent inside, where it later causes die-back, blistering, or a finish that never quite hardens.
Environment is part of the specification, not a background detail. Dust is the obvious enemy, but temperature and humidity matter just as much. Too cold and the coating will not cross-link properly, staying soft and vulnerable for weeks. Too hot and it skins over before it has levelled, leaving pronounced orange peel. High humidity can produce blushing — a milky haze in the film — particularly with fast solvents. A vehicle refinished properly in monsoon conditions is a vehicle refinished with those conditions actively managed, not ignored.
Step Seven: Flatting and Polishing
Even excellent spray work leaves some texture and the occasional inclusion. Once the clearcoat has cured hard, the surface can be flatted with very fine abrasives and machine-polished back to full gloss. This step removes minor dust nibs and orange peel and is what produces genuine mirror depth. It also demands restraint: clearcoat is finite, and polishing through it at an edge means starting the panel again.
Two-Wheelers and Fabricated Metal Have Their Own Rules
Motorcycle and scooter work brings extra challenges. Fuel tanks are exposed to petrol spillage and need genuine solvent resistance at the filler neck. Frames, swing arms, and engine covers face heat, stone chipping, and constant vibration. Plastic panels flex far more than steel and require flexible systems that will not crack. Small, highly curved parts also make blending nearly impossible, so accurate colour matching becomes even more important.
The same principles extend to fabricated and decorative metalwork — furniture frames, machine housings, architectural steel. Anywhere a hard, glossy, chemically resistant finish is expected on metal, the automotive approach of a bonded primer, a levelled base, and a durable polyurethane topcoat delivers a result that ordinary enamel simply cannot match.
Common Mistakes That Ruin Automotive Finishes
- Spraying colour directly over bare metal without a bonded primer, guaranteeing corrosion under the repair.
- Trusting the paint code without a spray-out card and daylight comparison.
- Sanding a hard edge instead of a long feather-edge, so the repair ring shows through the gloss.
- Applying filler thickly to cover damage that needed metalwork.
- Cutting flash-off times to finish a job in a day, trapping solvent in the film.
- Changing gun distance or air pressure between the test card and the panel, which shifts metallic appearance.
- Skipping the clearcoat on a metallic colour because it “looked fine” wet.
- Polishing a fresh finish before it has cured properly, which softens and marks the surface.
- Working in an uncontrolled, dusty space and hoping to polish out the consequences.
Protecting the Finish Afterwards
Fresh automotive paint continues hardening for days or weeks after it looks dry. During that window, avoid harsh detergents, abrasive polishes, and sealants, and be careful with high-pressure washing near edges. Once cured, the fundamentals are simple: wash regularly so grit does not sit on the surface, remove bird droppings and tree sap quickly because they etch clearcoat, park in shade where possible, and address stone chips early. A chip that reaches metal is an open door for corrosion, and sealing it takes minutes compared with the cost of repainting a rusted panel later.
Automotive-Grade Coatings from Zorvanta
Our Auto King Gold Pro automotive coating and PU Enamel Pro range are formulated for exactly these demands — high gloss, strong adhesion to prepared metal, and the weather and chemical resistance that vehicle and industrial surfaces need in Indian conditions. For fast workshop turnaround on suitable jobs, our quick-drying NC Gold Pro system helps shorten cycle times without giving up finish quality.
Browse the full product range to compare systems, read our companion guide on protecting metal surfaces from rust, or request a quotation for your workshop or production requirement. If you need help specifying a system for a particular substrate, contact our team.
Frequently Asked Questions (FAQs)
1. What is the difference between basecoat and clearcoat?
The basecoat carries the colour, metallic flake, or pearl, but has almost no gloss or durability by itself. The clearcoat is a transparent protective layer applied over it that provides gloss, depth, ultraviolet resistance, and protection against chemicals and washing scratches. Metallic and pearl finishes essentially require both layers.
2. Why does my repainted panel not match the rest of the vehicle?
Paint codes vary between production batches, and every vehicle fades slightly with age, so a factory-code mix will rarely match a weathered panel exactly. Accurate matching requires a spray-out card checked in daylight against the actual panel, and usually blending the new colour into the adjacent area so there is no hard boundary.
3. Can I paint over rust on a vehicle panel?
No. Surface rust must be removed back to sound metal and treated with a suitable bonded primer. Rust that has perforated the panel or is spreading from behind a seam needs mechanical repair — coating over it only hides the problem, and it will reappear through the new finish.
4. Why does automotive paint develop an orange-peel texture?
Orange peel occurs when the coating cannot flow out and level before it sets. Common causes are spraying at too high a temperature, incorrect gun setup or air pressure, applying the coat too dry, or using a solvent that evaporates too quickly for the conditions. Mild texture can be flatted and polished out after full cure.
5. How long should I wait before washing or polishing a freshly painted vehicle?
The film continues to harden for days or weeks after it feels dry. Avoid harsh detergents, abrasive polishing, and wax or sealant during that period, and be gentle with pressure washing around edges. Follow the specific cure guidance for the system used, as it varies by product and conditions.
6. Is a single-stage finish ever better than basecoat plus clearcoat?
Yes, for the right job. Solid non-metallic colours on commercial vehicles, chassis components, and fabricated metalwork are often better served by a single-stage system — it is simpler to apply, easier to touch up, and perfectly durable. Metallics and pearls, however, need a clearcoat to control flake appearance and protect the colour.
7. Do plastic bumpers and panels need different paint?
They need different preparation and a flexible system. Plastic flexes far more than steel, so the coating must flex with it or it will crack, and most plastics need an adhesion promoter before priming. Using a rigid metal system on a bumper is one of the most common causes of early cracking and flaking.
8. Can automotive coatings be used on non-vehicle metal?
Absolutely. The same approach — a bonded primer, a levelled base, and a durable polyurethane topcoat — delivers excellent results on metal furniture, machine housings, architectural steelwork, and decorative fabrication, wherever a hard, glossy, chemically resistant finish is required.
Need help choosing the right finish?
Talk to our team or request a tailored quotation for your project.